Rainbow Pocket Frames
- Mar 16, 2022
- 4 min read
Tutorial to customize using your own digital pattern papers in Canva

I knew the second I saw these pocket cards released in the Rainbow Scrapbook Kit by Ali Edwards that I had to try making them with some of those amazing digital papers included in the kit. In this post I'm sharing how I created these pockets using Canva, however the first part of this tutorial would most likely work in any program that you can use .png files in such as word, google docs and others. I've also included a video tutorial for Canva at the end of this post.
Let's get started!
The first thing I did was create a new page design in Canva at 11" x 8.5" (letter sized) because I wanted to make sure the pocket template included in the kit would fit as the actual size on the page. Then inserted the digital pocket template and centered it on the page. I did not resize it.

Next I downloaded this design as a .pdf for the highest quality print, then printed it on my HP Envy 7155 Photo Printer. Then I cut out the pocket design, and scored it along the fold lines. (as shown with instructions in the digital kit). This was essentially my "test run" and good practice to see how it would fold & go together. But my mind was still spinning with ideas, and I wanted to do more with this pocket design. So I created another design in Canva this time sized smaller at 5" x 8.5" knowing that the pocket template would still fit. But the advantage of this size is that it will fit to print on my Epson PM-400 photo printer which I actually hands down prefer to use for everything related to memory keeping when ever I can because it produces the most vibrant colors for the things I print.


This time I downloaded my design as a .jpg as it's a smaller file size and still produces great quality on my PM-400 printer. Also as an added tip, a .png and .pdf will print with a default setting of a white boarder around your design, and I have not found anyway to change this. So .jpg it is. Remember this!

Note: For this to work, you have to customize your page size settings before printing to tell your printer you have a longer page length.
You have to do both steps below:
1. Click on manage custom sizes to add a custom page size to your printer settings


2. Change the paper size setting on your Epson PM-400 to match


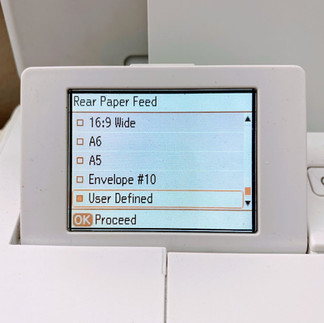

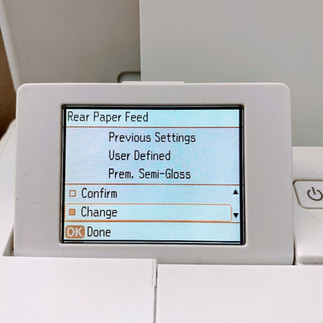
Screenshots for changing page size on Epson PM-400 printer. Click photo to enlarge.
Now that you have completed these steps, you're all set to print. I've added this photo of the pocket card printed on both printers so you can see the difference. The top card is most definitely brighter and printed on the PM-400.

Top: Epson PM-400 Bottom: HP 7155
How Customize in Canva
In this next section I'll show you how I customized this pocket card with a digital paper that's in the rainbow kit. If you're familiar with using "grids" in Canva these photos should help you see how I did it. Watch the video below to see how I do this with more explanation.

When you're happy with how it looks, download and print the file as per instructions I outline above. Or on a printer of your choice. I also cut the letter sized paper down to 5"x8.5" to fit my PM-400 printer.

Printed on Epson Premium Presentation Paper - Matte double-sided paper (linked below)
I traced one of the printed templates on the back of the rainbow page and then used a combination of my paper trimmer and scissors to cut it out. I also created & printed a separate page with the lined pocket inserts. To assemble the pocket card, I scored & folded per the template, inserted the lined pocket card and secured with adhesive.


I had so much fun playing with the designs of these pocket cards. Here's one pocket three different ways. The first pocket card is the file included in the kit, embellished with a little navy chipboard heart. For the second pocket card I changed the paper design and cut out the entire half circle & replaced the window flip with vellum. I embellished this one with a denim die cut butterfly and a custom canvas sentiment. And for the last pocket card, I printed the original design on vellum. (on my HP printer, because PM-400 doesn't recognize vellum paper well) I cut off the top flap, to make it a pocket then punched a hole and added some navy rick rack to the insert so it can slide in from the top.

The finished size of these window pocket cards measure approx. 3.75" x 3.75" but now that you know the process, I'm sure you could resize them smaller or larger to fit your project. I think these turned out super cute and are really fun to make & embellish. And using Canva to customize with digital papers opens up tons of possibilities for these pretty little pocket cards.
Rainbow Window Pocket Card Tutorial for Canva
Links mentioned in this post for your connivence:
Canva free design software
Rainbow Scrapbook Kit (digital)


Comments