How To Create Custom Photo Sizes in Canva
- Mar 7, 2021
- 5 min read
If you're like me you probably have a collection of apps on your phone that will allow you to combine photos into a collage and then print. I love the flexibility of printing my own photos which allows me more freedom in the design process of how my pocket pages will come together. Hands down my favorite printer for printing small print sizes is the Epson PM-400 photo printer.


Photo print created in "another" app
Recently, I discovered a design issue that most apps seem to have in common and I set out on a quest to find a solution.
What I wanted was: to create a collage photo with two 3x4 photos with an even white border around each photo.
Seems simple right?
What I found was: "it's complicated" and leaving you with something that looks like this.
The concept behind pocket scrapbooking is that it's quick + easy and anyone can do it. Apps are designed to make printing photos quick + easy so you can pull your page together quickly. So I immediately went to some of my favorite apps to make a quick two photo collage print (with white borders) for my page. But what I found was that my go to app didn't have that as a quick option. I tried a couple more apps I had on my iPhone, but wasn't able to create what I wanted. Then I turned to an amazing group of memory keepers in the Craft the Story group on Facebook and posted this as a question, hoping that there was another app out there that I could quickly download and use. Reading back the responses, I soon discovered that this wasn't as simple as it should be. I got "try this" and "I found this workaround" and well it became clear that finding an app to do this would be like finding a needle in a haystack.


So after taking this 45 min app detour, it became clear I should just design my own template, (which took me about 5 minutes start to finish) in what I now call my favorite scrapbooking software... Canva.com. I'm going to walk you through the steps to make this custom sized photo template in just minutes.
And once you make one, you will be able to make custom photo templates in any size your heart desires!
I currently use Canva Pro, and I'm showing this tutorial using a macbook pro. These steps should work the same for the free version. You can also try the Canva app on your phone or tablet. I've also recorded a Video Tutorial which you can find at the end of this post.
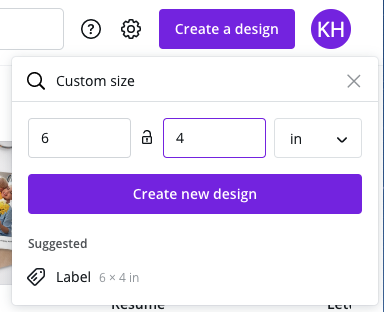
1. Create a custom sized template.
Click on CREATE A NEW DESIGN in the top right corner of your screen. Select + CUSTOM SIZE at the bottom of the drop down box and make a 6"x4" inch new design. This should match the size of your photo paper.


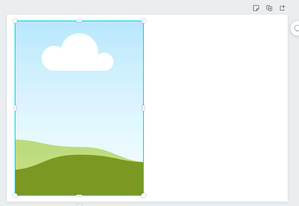
2. Insert your photo mask. (called a grid in Canva)
From the ELEMENTS section on the left slider, select one photo grid image. Click on it, and it will automatically insert into your design as a full image.


3. Resize your photo grid
I resized it to 2.7 x 3.7 using the corners or the white tabs on each edge of the grid. Remember, we want the photo to be smaller than the pocket size of 3x4 to allow for the white border. This grid now becomes a placeholder for your photo. Here's a cool trick. Copy + Paste the photo grid to get an exact match for your second photo. Then drag it to the other side of the page.
This is easiest done on the desktop version of Canva. The app version doesn't show the size dimensions so it can be tricky to get the exact size you need.
4. Create your center line
This will be your guide to cut your photo into two. From the ELEMENTS section again, select LINES or type line into the search box. Click on a single straight line, or for a shortcut, type the letter "L" on your keyboard and it will insert into your design like this.


5. Resize the length + move your line.
Click on the line, and dots will appear at each end. Slide the dots toward the center to resize the length of your line. Now grab the circle arrow and spin your line 90 degrees. A little box should pop up on the screen to show the angle. The goal here is to get your line vertical and fit your page.
6. Resize the weight + recolor your line.
Click on your line, and you will see a white tool bar pop up at the top of your screen.


The solid box is your line color, click this box to select a new line color. I like to use a light gray. The next box is the line weight I would recommend using a 1 or 2, not the 4 it defaults to. Click on the line one more time and gently slide it left/right & up/down until you see the purple center lines show up which will help you place your line perfectly in the center of the page. Now your cut line is a perfect cut line once your photo is printed.
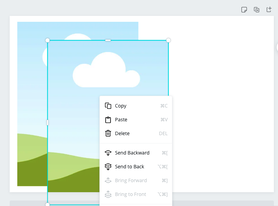
Reposition your photo grids to ensure they are in the center of each side of the photo. Again, click on the grid and gently slide it left/right & up/down until you see the purple center lines show up on your page. When you are done creating the template it should look like this.

7. Insert your photos.
Drag & drop your photos into Canva. Select/click on the grid you want image your photo on, and select a photo from your uploads. Your image will appear on the screen. Drag it into position to fill the grid. You can also grab your photo and drag/slide it directly into the grid. Repeat to add another photo to your template.
Tip: depending on the size of your original photo, you can double click on the grid to select the area of the image you want to feature.


8. Download + Print.
From the top right, select DOWNLOAD. I always download photos as a high quality .png file for printing. And recommend a .pdf for journal cards with text. But you can select from a list of file formats that work best for your needs. Once downloaded, I click on the image file to open it directly on my computer and print it to my Epson PM-400 photo printer using the settings shown in the photo.


I hope you'll give this tutorial a try, however if you'd rather skip the designing part we now offer pre-designed photo templates for use in Canva.

SHOP CANVA TEMPLATES FOR SCRAPBOOKING
Comments
Thank you so much for this tutorial! I use Canva at work, but I’ve never thought to use it like this for scrapbooking. This is going to be a game changer for me.
Comments
Hi Kim, Love this tutorial. I created the template so easily with your instructions. Hoping you can help me with the printing. I am running into an issue. When I print, the borders are all messed up. The edges are about 1/16th of an inch. Its like the picture is too big for the paper. I use a Dell laptop and an Epson XP-7100 printer. I tried changing a bunch of the print settings to no avail. Any advice would be much appreciated.